 The accuquilt GO! is here. I have waited two years for this. I really have nothing else to say. I am too excited for words.
Saturday, December 3, 2011
Accuquilt GO!
The accuquilt GO! is here. I have waited two years for this. I really have nothing else to say. I am too excited for words.
Sunday, November 27, 2011
Fall Madness
 Happy Post Thanksgiving to all. I hope everyone had a great holiday. We had a great 4 day weekend and filled it with lots of fun projects. We made this turkey veggie platter. I think people actually ate more veggies then normal with this guy around.
 We made a tree house out of cardboard. This was super hard and took a long time. And it really only lasted one day. But it gave me one hour of good free time.
 We had fun decorating with egg crate furniture. These lego mini men moved right in and got settled on the couch. Presumably they are watching a lego movie.
 While the tree house was being played with I got started on a winter wreath. I saw this in a magazine and new I had to make it. I cut out all the snowflakes with the cricut. Then I glittered them up changing the color of my fingers in the process.
 Here is the finished product on my door. I really love winter decorations but living in Southern California we don't get too much cold weather. In fact it was 85 degrees today. But this wreath is so cute and was super easy to make. I recently went on a sewing frenzy and made a lot of projects that need backing. So I hope to be posting some of those soon.
Friday, October 28, 2011
Learning to Sew

Who knew that having boys would be so much fun. I was expecting girls. Actually I was down on my knees praying for girls. At least one girl. When I got two boys I thought my days of arts and crafts and ribbons were over. Luckily I like action movies and Star Wars as much as my boys love arts and crafts. So I was overjoyed when my oldest son (I have twins, but since he was born first, he is technically the oldest) asked me to teach him how to sew. He chose the fabric he wanted, picked out the colors, and designed his very own pillow. I sat him at the machine and after reminding him not to sew his fingers we got started. Sitting directly behind him and monitoring everything he did (he is only 6 after all) he sewed this pillow. He even chose the thread. He did really well. I did some of the hard parts like closing up the pillow and sewing on the button. He was so proud of himself and immediately told me what he wanted to sew next. DH was not so excited. He thinks sewing is for girls. But when I explained that this project took patience, coordination, and required some complex thinking he agreed that it was a good experience. My younger son (by three minutes) wants to learn now. How exciting. I have visions of my two sewing machines lined up while my boys sew all sorts of things. I think next we will make pajama bottoms. I love having boys.
Sunday, September 25, 2011
Halloween Countdown Calendar
 This is my Halloween Countdown Calendar. (I know the e's are on backwards!!) I have been wanting one of these for a long time. Someone donated yards of black felt to me and I searched the Internet for a pattern. I found this one at Tip Junkie. Each square is actually a pocket that will contain a small Halloween treat. I had fun making this and the boys had fun counting and making sure I put the numbers on in order. Apparently no one was around when I hot glued the letters on. I am not sure what I am going to do about those backward e's. I can't wait to put this up October 1st.
Sunday, September 11, 2011
Zipper Mouths
 These are Zipper Mouth Characters. I saw them in the Terry's Village catalogue. I love them. So I decided to make my own. I think they came out pretty good considering I had no pattern or directions. I just copied the photo. They were so much fun to make and very easy. The zipper's don't really open into anything. I put some material behind them because I was afraid if I left it open someone would pull out the stuffing. One of my boys really liked these and is sleeping with them now. I plan to use them as part of my Halloween decorations. The dog was also very interested as he likes anything with stuffing in it. He actually likes to remove the stuffing out of things so we will be keeping these away from him.
Saturday, September 10, 2011
Aprons continued
 Here is a photo of the other apron I made using that great tutorial at Sew Much 2 Luv. Check out the pattern here.
Wednesday, September 7, 2011
Stuffed Pumpkin Tutorial
 I have seen these every where. You can buy them whole or buy a pattern. I decided to make my own pattern. I searched around on the web and found several sites with good suggestions. But I wanted to take it a step further by using recycled materials and some things I had stored in my craft box. Hope you enjoy.
 Start with your pattern. I used an old file folder and cut out panels in two sizes. One for a small pumpkin and another for a slightly larger version. I used some left over fabric I had at home but I also bought some fat quarters. One fat quarter will make you one pumpkin in either size. Cut out six panels.

Next you need to sew the panels together. Start with two panels, right sides together and sew. I used 1/4 seam allowance. These pumpkins are very forgiving so you don't have to be too exact. Then sew another panel to the right side on one of the panels you have already sewed. You should have three panels sewed together now. You don't have to iron or press. But I did clip the seems to help with the curve. Now repeat with the three remaining panels.  Now take the two sets of panels and place them right sides together. Pin all around leaving the top open. Sew from one end to the other. DON'T forget to leave an opening at the top. Turn the pumpkin right side out. You are now ready to stuff.
 I stuffed this one with the packaging material that came in an Amazon box. You could also use leftover batting, fabric scraps, mismatched socks, or just plain old stuffing. After you stuff it to your desired fullness you can stitch up the top leaving an opening for the stem. DO NOT CLOSE THE HOLE YET.
 I used Cinnamon sticks for stems. You could use sticks, pencils, whatever you want. The more creative the more interesting. I had these fall leaves left over from an old project and some string.
 Put your stem into the opening and pull your needle very tight. The hole should now be closed around your stem. Now tie off your thread. Add your leaves. I sewed them on with a few stitches. Fluff our your pumpkin. Now repeat the whole process again until you have tons of stuffed pumpkins.
Fall Prep - Halloween Apron
Fall is big, huge in my house. Not for the whole family, just for me. I love it. I love the colors, the decorations, and the cool weather. I also love all the fun events: visits to the pumpkin patch, Halloween carnivals, candles, getting to use the fireplace for the first time. I decided to start my preparations early with some cute sewing ideas. First up is a Halloween Apron. The pattern is from Sew Much 2 Luv. This blogger loves aprons and she has an amazing free tutorial. I loved it so much I made two. I will post the other one soon.
 I love aprons. I wear one every morning to cover my work clothes while I get breakfast ready. And I wear one every night when I make dinner and do dishes. I am tall and for some reason when I cook or clean everything hits me in the middle. Aprons give me the perfect coverage. I also love that this apron has pockets. Because, when I go through my house and find stray pieces of Lego, scraps of paper, or other lost items I can stuff them in my apron pockets. This would make a great holiday or hostess gift.
 I love aprons. I wear one every morning to cover my work clothes while I get breakfast ready. And I wear one every night when I make dinner and do dishes. I am tall and for some reason when I cook or clean everything hits me in the middle. Aprons give me the perfect coverage. I also love that this apron has pockets. Because, when I go through my house and find stray pieces of Lego, scraps of paper, or other lost items I can stuff them in my apron pockets. This would make a great holiday or hostess gift.
Wednesday, August 3, 2011
Twin Quilts
 My dear dear friends gave birth to twins on August 1, 2011. Two of the sweetest tinniest little girls I have ever seen. When they told us on New Year's Eve that they were having twins I went into planning mode. I knew I would make two quilts but I didn't know the sexes yet so I had to go slowly making sure what I made would work for either sex. In March when I learned it was going to be two girls I was so excited. One because I have two boys and I always wanted a girl. But more importantly the quilts I had started to make were mostly pink. Then life got busy and I was not sure I would finish in time. I sort of knew the due date but I was also moving at a slow pace. So last Saturday I dared to ask the due date hoping I would have lots of time left. August 12 I was told. Great. Plenty of time. Well as often goes with babies, and especially with twins, those little girls decided August 1 would be their birthday. OMG. I sewed feverishly for two straight day, finishing 2 hours before they were born!!! Today I brought the quilts to the proud parents.
  The quilts look the same but they are really different. If you look closely they have different patterns. I am a firm believer that twins should be treated separately and should have their own things. So I did not want two make identical quilts.
 I used a Moda jelly roll that I had received in a trade. Using the pattern Summer in the Park I found at Missouri Star Quilt Co. I made triangle after triangle. Then I sewed those triangles into squares and then into blocks. The more blocks I sewed the more beautiful the quilts appeared.
  I chose this sweet pink gingham fabric for the back. Both quilts have the same back. I like that the back is calmer then the front so you can use both sides depending on your mood.
 Of course I had to get my twins to model the quilts. They knew about the babies and were excited to hear that they were born. They also knew the quilts were for these babies and when I brought the finished quilts into them they said "We know you want us to hold them up for a photo."
 But they wouldn't stand still so I had to shoot most of the photos while they danced around the room.
 I also made the new mamma a nursing cover. I was so excited when I gave it to her and she exclaimed "I just bought one of these and I am going to return it now!" I know she will get a lot of use our of this. I followed a pattern I found on a blog and used boning for the first time in my sewing career. This was actually super easy to make and I made another one for my sister who gave birth to her fifth child on July 14, 2011.
 Lastly I had to make my signature burp cloths. These match the nursing cover. I love the polka dots. And the gingham is so dainty and sweet. I had a lot of fun making these items. It was great to work on something that was such a sweet surprise for the recipients. It was a very long and detailed project. These quilts are the most intricate ones I have ever made. But was it worth it? Yes, totally. Knowing that these sweet babies are going to lie on my quilts for tummy time was worth all the hard work.
 Wednesday, July 13, 2011
Homemade Lemonade
 We have been making lots of fresh lemonade. Suddenly I have tons of friends who have tons of lemons to give away. And I am taking them all. Lemons are great to have on hand. They can be added to ice tea, used in recipes, and frozen for future use. I wash all my lemons and whatever I don't use I cut up and freeze. A frozen lemon is much easier to zest then a ripe one. I always use frozen lemons when I poach chicken. Anyway back to the fresh lemonade. The recipe is so simple: 6 cups of water, 1 cup of sugar, and about 4 large or 6 small lemons. We have a neat lemon squeezer which we use and we make the whole thing in a drink cooler. I add tons of ice an shake it really well. Then I pop it in the fridge. When we are ready to use it I just grab the cooler and go. The kids love it. It has become a standard at all our play dates.
Tuesday, July 12, 2011
Tote Bag
 I love to make bags. I don't always use them but I love to make them. I think it is because they are fast projects and I can use fabric I wouldn't normally use for a quilt or clothing. This was a great pattern that I found at thimble, things I make and do.
 I added a zipper pocket and even a magnetic latch.
 This bag was really easy to make and the directions and photos were helpful and concise. I plan to take this on an upcoming trip to Hawaii. It is very roomy and will hold all my necessary laying by the pool items.
Thursday, June 30, 2011
Edible Art

I love making food that makes my kids happy. Now if I could only get them to eat it. I discovered this adorable site called Cute Food for Kids. This is a great site with lots of pictures and tons of fun food ideas. I especially like the angry birds ideas. I hate this game (as I hate all video games. They are boring, annoying, and lack any sort of fun.) But people love these games and my kids do as well. I am definitely going to try to make some of the angry bird food. And there are a lot of other cute ideas to try as well.
Tuesday, June 28, 2011
Kids Car Wash
 This is the Deluxe Kids Car Wash. It is from Family Fun Magazine. This thing is amazing. It is made out of PVC pipe that we bought at Home Depot. I thought it would take us a while to put together and I was giving myself a 1 week timeline. But it was really quite easy. We did it in one afternopon. I bought a PVC pipe cutter which made all the difference.
  I still have to add some sponges and some other items but the kids loved it. They played in it for hours. Hubby and I were like two little kids ourselves when we turned on the hose for the first time and the thing actually worked.
  This will be the hit of the summer. The boys are going to have so much fun with their friends with this. I plan to rotate it between the front and back yard to give the grass a break. Plus I can't wait to see what the neighbors think of it. Let the summer fun begin.
Sunday, June 26, 2011
Last Day of School
 On the boys last day of school aftercare I brought all the staff a cupcake in these cute containers. I found them at Target and got the idea from another blog. Cupcakes in a jar are really big right now. You pile in the cupcake with frosting and add a spoon. I couldn't find jars so I used this cute tin pails. I put wax paper in and added some ribbon and a special note and dropped in a homemade cupcake. The staff loved them and the boys loved handing them out. It was a great end to a great year. My boys completed Kindergarten and will be going into first grade next school year. I can't believe I have two first graders. It was just yesterday that I held them both for the first time.
Friday, June 17, 2011
Father's Day Card
 Look at this adorable origami T-shirt card you can make for Father's Day. It even doubles as a card holder so you can put those gift cards inside. I followed the directions here. And I did take their advice and make a demo first so that I could work out the kinks. It came out really cute.
Tuesday, June 14, 2011
Robot Cupcake Cake
 My boys just turned 6. I always make their cake. It is a huge part of every birthday. We start discussing the cake months ahead of time. We looking at photos and talk about designs. This year the boys chose a Robot Cupcake Cake from Family Fun Magazine. This was really an easy cake to make. I made the cupcakes in advance. Then I just had to decorate using all the candy and cookies I had bought. It was a big hit with the kids. While I love birthday parties and making my kids happy I hate the aftermath of the party. Opening toy after toy and trying to put together a 100 piece toy before my child collapses into hysteria. Then having to listen to my child struggle to put together a lego toy that is supposed to be fun. There are certain toys that should really be a banned. I love legos. They are a toy that allows for creativity and can be used over and over again. What I don't like is a Lego Connect 4 game. This is a useless and impossible toy. Regular Connect 4 it just fine. Why do we have to have one made out of legos that I had to spend an hour putting together? Some toys I don't understand at all - Beyblades is one of them. You will have to look this one up if you are really curious. It is hard to explain but seems to fascinate little boys. Again, no imagination required. Thank goodness I don't have to do this again for a whole year.
Monday, June 13, 2011
Bullentin Board
 My niece and I created this bulletin board for her bedroom. She saw the project board I have in my sewing room and wanted one for her room. We went to Joann's and she picked out the sweetest white fabric with tiny flowers on it, the ribbon, and the flowers. We glued and glued and created this adorable bulletin board.
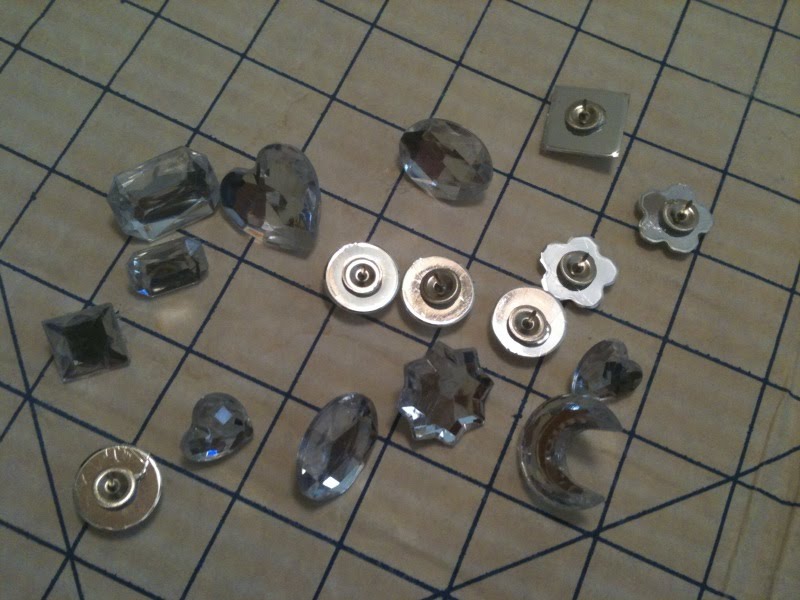 We bought large over sized rhinestones and glued pins on the back to make push pins. I love these so much. You can use anything you want to make pushpins. Just buy the pins that have a flat back. I think you could use buttons, gems, stickers, or anything that can be hot glued.
 Here is the finished board hanging up in her room. Just the prefect thing to hold pictures of friends and Justin Bieber. So dreamy!!
 Friday, June 10, 2011
D's first Quilt
 This is my son's first quilt. He went through my scraps and made the pattern all by himself. I was so impressed with it that I sewed it together for him. His attention to detail and the symmetry in the design were, in my opinion, very advanced for an almost six year old. He was very excited about the making of his first quilt. He practically sat on me while I sewed it. He chose the backing which is a baseball print and I added his name to the middle strip. He even picked out the thread color. Normally he sleeps with an old diaper cloth that he calls Blankie. After this quilt was completed Blankie went into the linen closet and he now sleeps with his quilt.
Wednesday, May 25, 2011
5K
 I ran my first 5K two weekends ago. I am very proud of myself and need to take a moment to brag a little. I only started running in July of 2008. Before that I couldn't run to get the mail or I would get shin splints, my side would ache, and I would get pains in my chest. But sometime in 2008 DH started running on the treadmill. Well, I couldn't let him be the only one in the family who was running. So I started running, minute by minute. At first I could only go 2 minutes, then 5, then 15. Then I plateaued. I needed something more to finally get rid of that twin baby belly I had been carrying around since my boys were born. On the advice of a friend I started going to Barry's Bootcamp. This is a program of 1 hour classes where they essentially work your but and make you feel like you want to vomit. I started this on December 30, 2010. I tried to go three times a week. But that didn't always happen. I never lost any weight but my body started to change. My arms got leaner. My waist got smaller. And I started to see my hip bones again. Then we got an opportunity to run a 5K through our temple. I practiced a couple of time on the treadmill. It was hard but I was determined to at least finish the run. I was not concerned with time. I told my trainer at the Bootcamp and he said he wanted to know what my time was. Hmm, another challenge ws set. Now I wanted to get a good time. On the day of the race I told DH let's not try and stay together. Let's just concentrate on finishing. Ok, Ok, whatever he said. The race started and I took off. It was so much fun to run outside and with people cheering you on. I kept a good pace and never got winded. I sprinted the end (mostly because I was neck and neck with a 12/13 year old boy, no way was I going to be bested by a boy!!!) I crossed the finish line at 28:20. I couldn't believe it. That was better then my best time on the treadmill. DH came in right behind me. He kept saying where did you go, I never saw you after we took off ;). I was so proud of both of us. I felt great after the race. I have the bug now. I can't wait to run another race. My next goal will be a 10K. In case anyone cares to know I am 39. It is never too late to start. You just need to find your motivation. And in case you need to know this also, the boy came in 1 second ahead of me. I couldn't run him over now could I!!!!
Tuesday, May 24, 2011
Party Favors
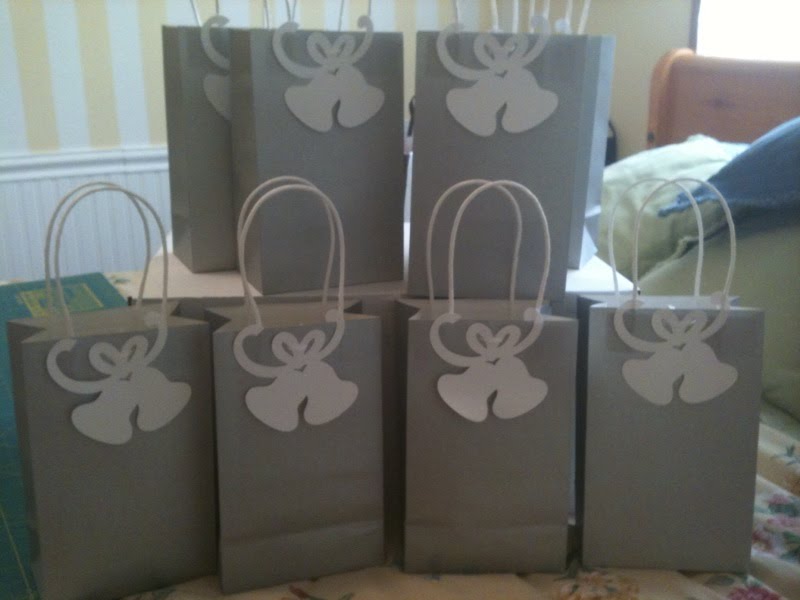 I love planning parties. If you follow this blog or just know me well then you already know this. These are the party favors for our 10th Anniversary Wedding Vow Renewal. Each bag has little goodies including some Vegas related items. The bags I got at the local party store. The bells I made using my Cricut and the Sweethearts cartridge. I wanted to do something for the friends who are going all the way to Las Vegas to share in this special event with us. I love my Cricut and every time I take it out I realize that all over again. You can do so many fun things with it.
A special thank you to Jan for lending me the cartridge and dropping it off at my house. :)
Sunday, May 22, 2011
Displaying Quilts
 It is always hard to figure out ways to display my quilts. They don't really match the rest of my house and I try to keep them in my sewing room. This ladder piece is a great way to display them. This is actually a piece from Crate and Barrel that has shelves. My sister-in-law offered it to me when she decided she didn't need it anymore. I packed the shelves away and pulled out all my quilts. I was actually looking for a piece like this so this worked out perfect.
Tuesday, May 17, 2011
10 Year Wedding Anniversary
 DH and I are about to hit the 10 year anniversary. To celebrate we are renewing our vows in Las Vegas. Our wedding was very traditional. The vow renewal will be anything but traditional. No family are coming, just friends. We will be in a Law Vegas Wedding Chapel instead of under a chuppah. Elvis will be officiating instead of a Rabbi. My dress will be shorter and DH won't be wearing a tux. And these crazy black and white stripped shoes will be walking me down the aisle instead of my father. Hey, this is Vegas baby, Vegas!!!! More details to come regarding this fun event.
Monday, May 16, 2011
Top Secret Update
 This is all I can show you of the top secret quilt I am working on. It is a daunting project that I have taken on and I hope I can pull it off. The biggest problem is finding time to work on it. I am trying to teach my children water conservation and so I am timing them in the shower. Each boy gets a 7 minute shower (give or take). I sometimes inflate the time if I think they need an extra minute. They are doing really great and are learning to take quicker showers. The challenge for me is to see how many quilt squares I can make in 14 minutes since this in the only amount of time I get each night to sew. Last night I turned out 4 squares. At this rate I should finish by, say, 2014!! Yikes!
Friday, May 13, 2011
Homemade Granola
 We eat granola by the truckload. The granola that comes in the blue box at Trader Joe's is our favorite. I have been wanting to make my own granola for a while. So we finally tried it. With D as my little helper we mixed rolled oats, butter, and honey together. We then scavenged the pantry for leftover nuts and mini chocolate chips and threw those in. I added some candied ginger for taste. After baking and stirring for 30 minutes we had a nice batch of granola. I would not say it is as good as the blue box variety but it still tastes pretty good.
Thursday, May 12, 2011
Granola
 We love granola. I buy boxes of it a time. If you are familiar with Trader Joe's then it is the blue box. My kids were able to identify this blue box from the time they were very young. Last night we tried making our own granola. We used rolled oats, honey, butter, and some leftover nuts we had. We cooked, stirred, and cooled. It tastes pretty okay. It doesn't have all the sugar that the store bought ones have so it is not as sweet. But the honey gave it a nice taste.
Subscribe to:
Posts (Atom)

