Friday, October 28, 2011

Learning to Sew


Who knew that having boys would be so much fun. I was expecting girls. Actually I was down on my knees praying for girls. At least one girl. When I got two boys I thought my days of arts and crafts and ribbons were over. Luckily I like action movies and Star Wars as much as my boys love arts and crafts. So I was overjoyed when my oldest son (I have twins, but since he was born first, he is technically the oldest) asked me to teach him how to sew. He chose the fabric he wanted, picked out the colors, and designed his very own pillow. I sat him at the machine and after reminding him not to sew his fingers we got started. Sitting directly behind him and monitoring everything he did (he is only 6 after all) he sewed this pillow. He even chose the thread. He did really well. I did some of the hard parts like closing up the pillow and sewing on the button. He was so proud of himself and immediately told me what he wanted to sew next. DH was not so excited. He thinks sewing is for girls. But when I explained that this project took patience, coordination, and required some complex thinking he agreed that it was a good experience. My younger son (by three minutes) wants to learn now. How exciting. I have visions of my two sewing machines lined up while my boys sew all sorts of things. I think next we will make pajama bottoms. I love having boys.

Sunday, September 25, 2011

Halloween Countdown Calendar

This is my Halloween Countdown Calendar. (I know the e's are on backwards!!) I have been wanting one of these for a long time. Someone donated yards of black felt to me and I searched the Internet for a pattern. I found this one at Tip Junkie. Each square is actually a pocket that will contain a small Halloween treat. I had fun making this and the boys had fun counting and making sure I put the numbers on in order. Apparently no one was around when I hot glued the letters on. I am not sure what I am going to do about those backward e's. I can't wait to put this up October 1st.

Sunday, September 11, 2011

Zipper Mouths

These are Zipper Mouth Characters. I saw them in the Terry's Village catalogue. I love them. So I decided to make my own. I think they came out pretty good considering I had no pattern or directions. I just copied the photo. They were so much fun to make and very easy. The zipper's don't really open into anything. I put some material behind them because I was afraid if I left it open someone would pull out the stuffing. One of my boys really liked these and is sleeping with them now. I plan to use them as part of my Halloween decorations. The dog was also very interested as he likes anything with stuffing in it. He actually likes to remove the stuffing out of things so we will be keeping these away from him.

Saturday, September 10, 2011

Aprons continued

Here is a photo of the other apron I made using that great tutorial at Sew Much 2 Luv. Check out the pattern here.

Wednesday, September 7, 2011

Stuffed Pumpkin Tutorial

I have seen these every where. You can buy them whole or buy a pattern. I decided to make my own pattern. I searched around on the web and found several sites with good suggestions. But I wanted to take it a step further by using recycled materials and some things I had stored in my craft box. Hope you enjoy.


Start with your pattern. I used an old file folder and cut out panels in two sizes. One for a small pumpkin and another for a slightly larger version. I used some left over fabric I had at home but I also bought some fat quarters. One fat quarter will make you one pumpkin in either size. Cut out six panels.

Next you need to sew the panels together. Start with two panels, right sides together and sew. I used 1/4 seam allowance. These pumpkins are very forgiving so you don't have to be too exact. Then sew another panel to the right side on one of the panels you have already sewed. You should have three panels sewed together now. You don't have to iron or press. But I did clip the seems to help with the curve. Now repeat with the three remaining panels. Now take the two sets of panels and place them right sides together. Pin all around leaving the top open. Sew from one end to the other. DON'T forget to leave an opening at the top. Turn the pumpkin right side out. You are now ready to stuff.


I stuffed this one with the packaging material that came in an Amazon box. You could also use leftover batting, fabric scraps, mismatched socks, or just plain old stuffing. After you stuff it to your desired fullness you can stitch up the top leaving an opening for the stem. DO NOT CLOSE THE HOLE YET.
I used Cinnamon sticks for stems. You could use sticks, pencils, whatever you want. The more creative the more interesting. I had these fall leaves left over from an old project and some string.
Put your stem into the opening and pull your needle very tight. The hole should now be closed around your stem. Now tie off your thread. Add your leaves. I sewed them on with a few stitches. Fluff our your pumpkin. Now repeat the whole process again until you have tons of stuffed pumpkins.

Fall Prep - Halloween Apron

Fall is big, huge in my house. Not for the whole family, just for me. I love it. I love the colors, the decorations, and the cool weather. I also love all the fun events: visits to the pumpkin patch, Halloween carnivals, candles, getting to use the fireplace for the first time. I decided to start my preparations early with some cute sewing ideas. First up is a Halloween Apron. The pattern is from Sew Much 2 Luv. This blogger loves aprons and she has an amazing free tutorial. I loved it so much I made two. I will post the other one soon.

I love aprons. I wear one every morning to cover my work clothes while I get breakfast ready. And I wear one every night when I make dinner and do dishes. I am tall and for some reason when I cook or clean everything hits me in the middle. Aprons give me the perfect coverage. I also love that this apron has pockets. Because, when I go through my house and find stray pieces of Lego, scraps of paper, or other lost items I can stuff them in my apron pockets. This would make a great holiday or hostess gift.

Wednesday, August 3, 2011

Twin Quilts

My dear dear friends gave birth to twins on August 1, 2011. Two of the sweetest tinniest little girls I have ever seen. When they told us on New Year's Eve that they were having twins I went into planning mode. I knew I would make two quilts but I didn't know the sexes yet so I had to go slowly making sure what I made would work for either sex. In March when I learned it was going to be two girls I was so excited. One because I have two boys and I always wanted a girl. But more importantly the quilts I had started to make were mostly pink. Then life got busy and I was not sure I would finish in time. I sort of knew the due date but I was also moving at a slow pace. So last Saturday I dared to ask the due date hoping I would have lots of time left. August 12 I was told. Great. Plenty of time. Well as often goes with babies, and especially with twins, those little girls decided August 1 would be their birthday. OMG. I sewed feverishly for two straight day, finishing 2 hours before they were born!!! Today I brought the quilts to the proud parents.

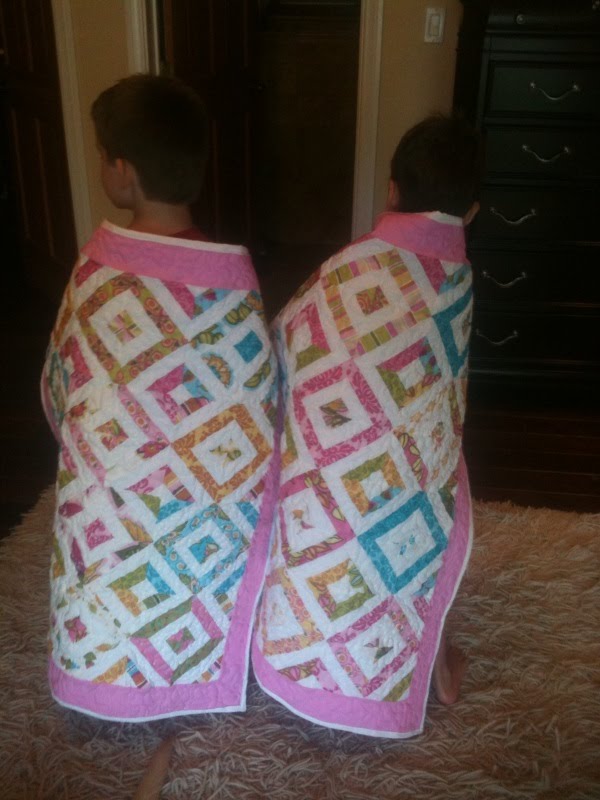
The quilts look the same but they are really different. If you look closely they have different patterns. I am a firm believer that twins should be treated separately and should have their own things. So I did not want two make identical quilts.


I used a Moda jelly roll that I had received in a trade. Using the pattern Summer in the Park I found at Missouri Star Quilt Co. I made triangle after triangle. Then I sewed those triangles into squares and then into blocks. The more blocks I sewed the more beautiful the quilts appeared.


I chose this sweet pink gingham fabric for the back. Both quilts have the same back. I like that the back is calmer then the front so you can use both sides depending on your mood.


Of course I had to get my twins to model the quilts. They knew about the babies and were excited to hear that they were born. They also knew the quilts were for these babies and when I brought the finished quilts into them they said "We know you want us to hold them up for a photo."


But they wouldn't stand still so I had to shoot most of the photos while they danced around the room.


I also made the new mamma a nursing cover. I was so excited when I gave it to her and she exclaimed "I just bought one of these and I am going to return it now!" I know she will get a lot of use our of this. I followed a pattern I found on a blog and used boning for the first time in my sewing career. This was actually super easy to make and I made another one for my sister who gave birth to her fifth child on July 14, 2011.

Lastly I had to make my signature burp cloths. These match the nursing cover. I love the polka dots. And the gingham is so dainty and sweet. I had a lot of fun making these items. It was great to work on something that was such a sweet surprise for the recipients. It was a very long and detailed project. These quilts are the most intricate ones I have ever made. But was it worth it? Yes, totally. Knowing that these sweet babies are going to lie on my quilts for tummy time was worth all the hard work.